Good morning all you crafty Peeps, it's time for our mid month post and it seems it's come round to my turn to share either a new technique or one I enjoy doing.
There is nothing new about what I am going to share, but I am always reminded that new crafters are joining us and blogland all the time and it's easy to forget that we all started the same way keen to expand our crafting techniques so I hope this might be of help to a few of you.
So it's some inkiness as that's what I enjoy most in my crafting activities and I am also rather keen on inspirational quotes so the two have come together on some of today's shares. I thought a few photos and a short tutorial might help and apologies to those of you well versed in all of this as it's not my intention to teach anyone to suck eggs !
For the Butterfly cards I used two colours of distress inks, although I used both ink pads and distress pens either or will work fine. In addition a black archival ink pad, an acrylic block for mixing the inks and a pipette......you can manage without this and use a wide paint brush that will hold water instead but a pipette does make life easier. And of course your chosen stamps, I used Penny Black Butterflies, Visible Image quotes and an Inkylicious background. I bought my pipettes on Amazon, 100 for about £2.50.

My starting point is to dab the first colour of ink onto a small acrylic block and add small drops of water and mix so you have a little pool of colour, if using a pipette draw up the liquid and drop randomly holding the pipette 3- 4 inches above your piece of card, that allows the ink to splatter a bit as it lands which all adds to the random look. When doing this I concentrated on the areas to the left of the card as I knew this was where I wanted to stamp, then repeat with your second colour.
If using a brush load it with the diluted paint and flick the wooden stem/handle of the brush with your finger 3" - 4" above the piece of card. You will get random sized 'blobs' and if any look too wet or intense use a piece of kitchen roll to lift off some of the excess. You might find it helps to have a test run on a piece of scrap card so you can get confident with the process.
Next I took the background stamp and used a black distress marker to randomly ink just a section down the middle and repeat stamped it over the ink splatters. I stamped the sentiment next with black archival ink. The Butterflies are inked direct to stamp........doing this is easier with distress markers but still possible with ink pads, you just need to take a little more care were you ink, then cut out and add wire antennas and fix to the card. Finally I matted and layered onto coordinating cardstock and an A5 card.
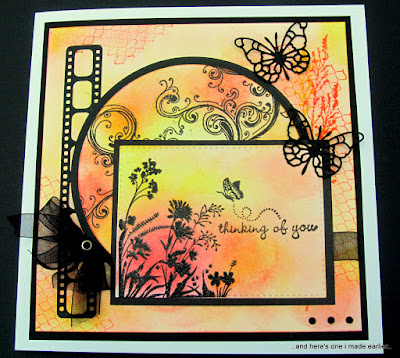
Here's another, almost the same just different colours and Butterfly stamp.

This card below was one on my Tattered Lace samples for the USA shows a while back but shows a different use of inks which is also great fun.
For this one you will need a selection of distress inks, an actylic block, pipette or wide paint brush (one that will hold plenty of water) and a drinking straw.
Start by stamping or in the case of the above card die cutting the image, inking with versamark and heat embossing with detail clear powder (as in the photo below). You need to do this to ensure your image is water resistant.
Next follow the same procedure as the Butterfly card at the top of this post to create a watery pain mix, then pick up the colour with a pipette or brush and drip blobs onto the cardstock around your chosen image as below.........one colour at a time works best spacing them out to leave room for more colours in-between. Also you need to be fairly generous with the amount of inky liquid and use rather more than on the card at the top as with this technique you need sufficient liquid ink to move across the card.
Blowing each blob of colour with the drinking straw, gently encouraging the wet ink outwards towards the edges of the card, tilting the card if necessary. Keep repeating with your chosen colours. I used the same inks to add a little colour to the skull. The photo above was actually a Butterfly card but same process.
And as my DT creation at the start of the current challenge (above) was also inky I will briefly explain how I created the background for that one.
I used Brushos on this one, sprinkling one colour at a time - here I used Ost Red, Violet and Lemon, spritzing generously with water so there is a visible pool of colour on the card, then use the same straw blowing and titling technique as the skull card. As quite a lot of water is used for this technique I tend to leave each color to dry for a few minutes before moving on to the next. I find this way there is less chance of the colours contaminating one another, you will probably get a little merging where the colours meet as I did with the red and purple but on the whole the colours stay put.
With any of these techniques, if you find you have more liquid paint on your cardstock than you intended you can easily soak it up by dipping the corner of a piece of kitchen roll into the wet ink............I prefer not to lay the tissue onto the ink as it may well lift off more than you want, also it will take the intensity out of the colour. Of course if you want a paler finish then that is exactly how to achieve it.
Many thanks for taking a look and I hope I have encouraged you to get inky !!